You looked up and saw it: a section of your ceiling is bowing down, maybe discolored, maybe visibly wet. That bulge isn’t just cosmetic. It means water has been collecting above the drywall, and the ceiling is now holding a load it wasn’t designed to carry. The next step could be a collapse, and it can happen fast.
Here’s what to do right now, and what to expect when the pros show up.
Get people and pets out from under it immediately
This is the non-negotiable first step. A waterlogged ceiling panel can fail without any warning. A standard 4-by-8 sheet of drywall weighs around 55 pounds dry. Add a significant amount of pooled water and that number climbs fast. If it lets go, the debris falls with force, and the electrical fixtures that are often built into ceilings make the situation more dangerous.
Clear the room. Move furniture if you can do it quickly, but don’t stand under the bulge to do it. Keep kids and pets out of the area until the situation is fully assessed. This isn’t overcaution. Ceiling water damage is one of the more physically dangerous water emergencies a homeowner can face, and it deserves the same level of respect you’d give a downed power line.
The controlled-drain decision
Once people are clear, you’ll face a choice that trips up a lot of homeowners: should you poke a hole in the bulge to let the water drain in a controlled way?
The honest answer is that it depends, and it carries real risk. If the bulge is holding a significant amount of water and you can see the ceiling visibly straining, a small controlled drain can reduce the load and buy time before a sudden full collapse. Use a screwdriver to poke one small hole at the lowest point of the bulge, and have buckets and towels ready before you do it.
But do this carefully. Don’t stand directly under the point you’re puncturing. Don’t use anything that could punch too large a hole and trigger the collapse you’re trying to avoid. And if there’s any chance the water has reached light fixtures or ceiling fans in that zone, skip this step entirely and focus on the next one first.
Cut power to the affected area
Water and electricity are a serious combination. Before anything else involving the ceiling itself, go to your electrical panel and flip the breaker for the room or zone where the damage is. If you’re not sure which breaker covers that area, turn off the main.
This matters because ceiling fixtures are often the first place water migrates after it saturates drywall. Even if you can’t see visible water around a light fixture, moisture inside the electrical box above it can create a shock hazard or a fire risk. Don’t flip a switch in the affected room to “test” if the power is on. Go straight to the panel.
Once power is off, you can assess the situation more safely. If the bulge is near a recessed light or a ceiling fan, that’s a sign water has traveled laterally from the source, which means the actual leak may be farther away than it looks.
Find and stop the water source
The ceiling is showing you where the water ended up, not necessarily where it came from. Water travels along joists, vapor barriers, and HVAC ducts before it pools in one spot. The real source could be a roof leak, a burst pipe in the floor above, an overflowing toilet or shower, a failed water heater on an upper level, or a slow drip that’s been going on for weeks.
Work backward. If you have a second story above the damage, check bathrooms and utility areas first. Look for standing water, a running toilet that won’t stop, or a wet cabinet under a sink. If the damage is on the top floor of a single-story home, the roof is the likely culprit, especially after one of San Diego’s atmospheric-river storms where gutters get overwhelmed and water finds every gap in aging flashing.
Stop the source before you do anything else to the ceiling. Draining the bulge while water is still actively flowing in only delays the inevitable and adds more water volume to the problem.
If you can’t find the source quickly, shutting off the main water supply to the house stops most leak scenarios. It won’t stop a roof leak, but it eliminates plumbing as a cause and lets you focus your search.
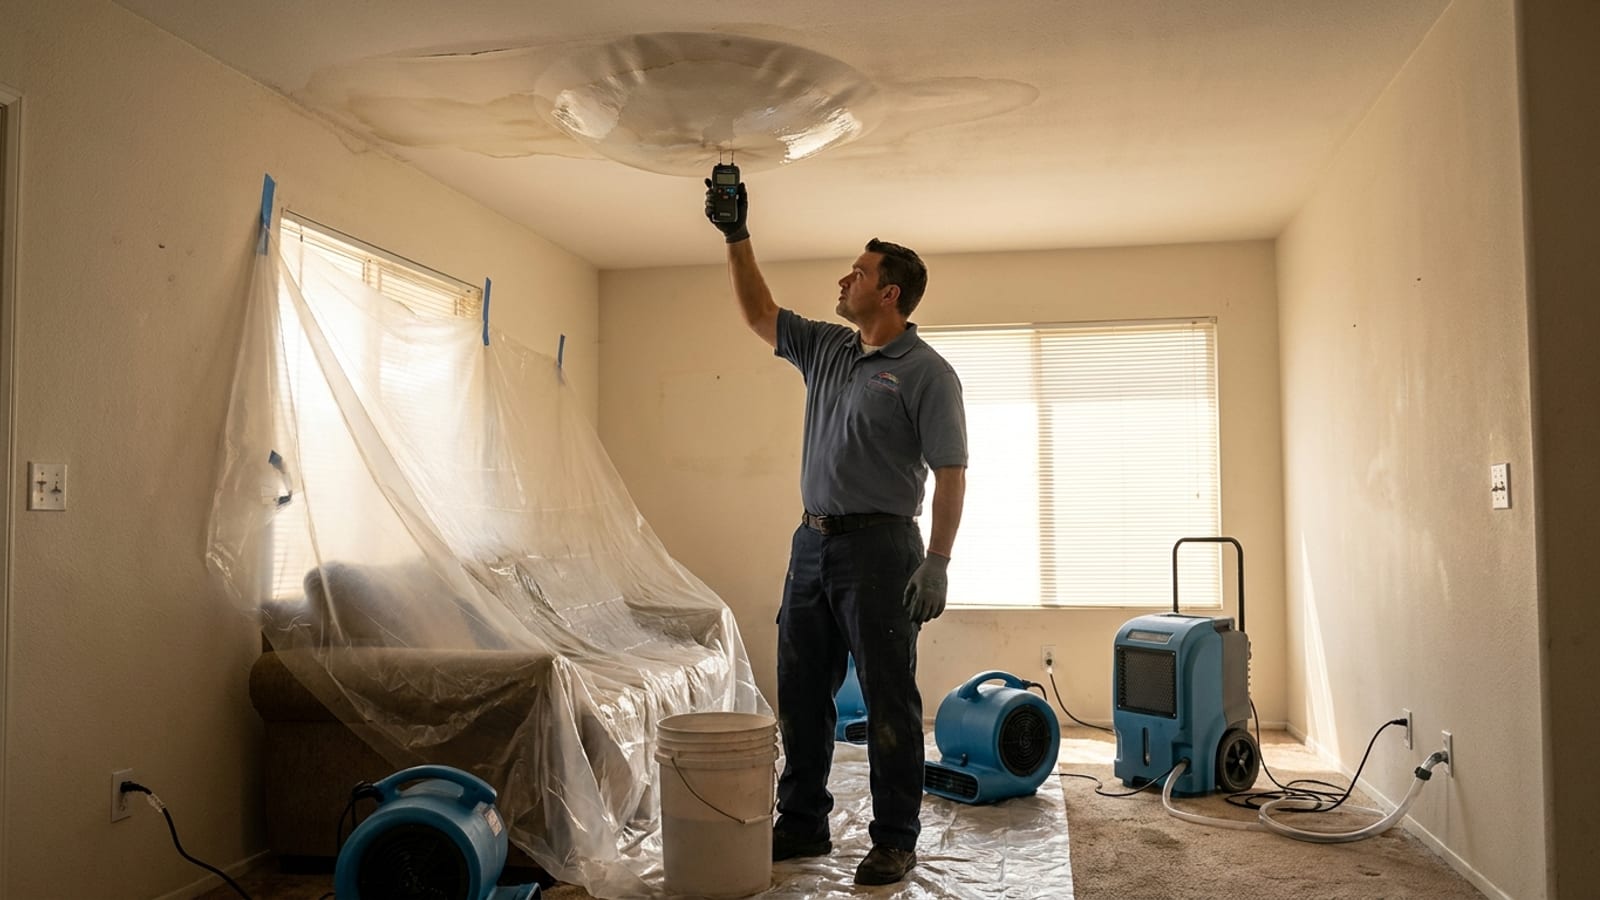
What happens when restoration professionals arrive
Once the immediate safety steps are handled, this is when professional assessment matters most. Restoration crews don’t just look at the ceiling you can see. They use moisture meters and thermal imaging to map where water has traveled inside the wall and ceiling cavities, often revealing saturation that extends well beyond the visible bulge.
The question they’re answering is whether the ceiling assembly can be dried in place or has to come down.
Drying in place is possible when the water intrusion was caught early, the drywall hasn’t delaminated or lost its structural integrity, and moisture readings show saturation is limited to a defined area. Technicians will cut small inspection holes (usually a few inches) to insert equipment and confirm drying progress over several days. This approach saves material and labor costs.
But if the ceiling has been wet for more than 24 to 48 hours, if readings show the insulation above is fully saturated, or if the drywall has visibly crumbled, bubbled, or separated at the seams, it needs to come out. Wet insulation holds moisture for weeks even when the drywall surface feels dry. Leaving saturated insulation in place is how mold gets a running start, and in a climate where San Diego’s coastal humidity keeps indoor air moisture levels elevated year-round, that’s a problem that compounds quickly.
The water damage restoration process from this point typically involves strategic demolition to remove only what can’t be saved, thorough drying of the structural framing and cavity using air movers and commercial dehumidifiers, moisture monitoring over several days to confirm target readings are met, and then rebuild. The timeline depends on how much material was affected and how long the water had been sitting.
Why the timeline matters more than it seems
This is worth being direct about: a ceiling that sagged and got “mostly dried out” is not the same as a ceiling that was properly remediated. The first 24 hours after a water intrusion are the window where you have the most control over how the situation develops.
After 24 to 48 hours, mold spores that are always present in any home environment have everything they need to begin colonizing wet building materials. Drywall paper, wood framing, and insulation are all organic materials that mold can grow on. Once that process starts, the scope of work expands significantly, and the health implications change.
For older homes in neighborhoods like Oceanside, La Mesa, or Chula Vista that were built with older drywall formulations and may have inadequate vapor barriers, this timeline is even less forgiving. The materials absorb and hold moisture differently than newer construction.
A ceiling water stain that appears weeks after the visible damage is dried is often the first sign that the job wasn’t completed properly. The stain means moisture is still migrating through the material. That’s a situation where the cost of doing it right the second time is always higher than doing it right the first time.
How pros determine what has to come down
Here’s the practical breakdown of how a restoration crew makes the call on demolition:
The drywall itself: If the panel is intact, holds its shape, and moisture readings show it’s in the drying range (typically below 17 percent moisture content for standard drywall), it can often be dried in place. If it’s soft, crumbling, or the paper face is separating, it comes out.
The insulation above: Fiberglass batt insulation holds water in its fibers and doesn’t dry effectively when left inside a ceiling cavity. Blown-in insulation clumps and compresses when wet, losing its thermal value and becoming a moisture reservoir. Saturated insulation almost always gets removed.
The framing: Wood framing that has been wet for less than 24 hours can usually be dried. Framing that shows swelling, darkening, or soft spots may be harboring early mold growth and requires more aggressive treatment.
The subfloor above (if applicable): If the leak came from a plumbing fixture on an upper floor, the subfloor above the ceiling may have absorbed water from both sides. That’s a material that needs its own moisture assessment separate from the ceiling.
When to call
A sagging ceiling after water intrusion is not a wait-and-see situation. If you’re seeing a bulge, you’re already past the early-response window. The steps above help you manage safety right now, but the assessment and drying work that determines the long-term outcome of your home requires professional equipment and expertise that can’t be replicated with household fans and towels.
Call us at (858) 925-5546 for a same-day estimate.