You didn’t see a flood. You didn’t hear a burst pipe. You just noticed the kitchen floor felt a little soft near the fridge, or maybe a faint musty smell appeared out of nowhere. That’s the refrigerator water line leak doing what it does best: hiding in plain sight for weeks, sometimes months, while it quietly destroys the floor underneath your feet.
This is one of the sneakiest sources of hidden water damage in San Diego homes, and it’s far more common than people expect.
Why refrigerator water line leaks are so hard to catch
The supply line that feeds your refrigerator’s ice maker and water dispenser is small, usually a quarter-inch braided line or thin plastic tubing. It runs along the back of the fridge and connects to a valve behind or underneath the unit. Most homeowners never look back there, and why would they? The fridge sits pushed against the wall, and as long as the ice keeps coming, there’s no obvious reason to check.
When that line develops a slow pinhole leak or a loose compression fitting starts weeping, the water doesn’t pool dramatically on the floor. It drips slowly onto the back panel or the floor directly behind the unit. The fridge’s condenser coils generate just enough heat to evaporate the thinnest drips, which actually makes the leak harder to detect. What doesn’t evaporate seeps under the flooring and into the subfloor below.
In older San Diego homes with vinyl tile or laminate kitchens, the water wicks under the flooring material and spreads outward in every direction. You might not see a single wet spot on the surface while an area three feet in diameter underneath is completely saturated. Slab-on-grade homes, which are common throughout El Cajon, La Mesa, and Chula Vista, add another layer of complexity because water can also migrate along the concrete slab, spreading far from the original source.
The signs your refrigerator has been leaking for a while
By the time most homeowners connect the dots, the leak has been going on for a significant stretch of time. Here’s what to look for before you pull the fridge out:
Flooring changes near the fridge. Laminate or hardwood that has started to buckle, cup, or show soft spots is often the first visible sign. A vinyl floor that feels springy or slightly spongy underfoot means the subfloor has absorbed moisture. Tile floors will show the problem differently: grout lines that have darkened, turned gray-black, or feel gritty are absorbing contamination from the water working through from below.
A musty smell in the kitchen. This is one of the most reliable early warnings. If you’ve cleaned the kitchen thoroughly and the smell persists, especially near the fridge or the surrounding cabinets, you’ve likely got moisture sitting somewhere it shouldn’t be. The mild, coastal humidity that settles into San Diego neighborhoods during the marine-layer months can make a musty smell harder to place, but if it’s concentrated in one area of the kitchen, pay attention.
Discoloration on the baseboards or lower cabinets. Water migrating from beneath the floor can wick up into the toe kick of lower cabinets or cause the paint on adjacent baseboards to bubble or peel. These are signs the moisture has moved well beyond the point of origin.
Ice maker running constantly or producing less ice. A slow drop in water pressure at the connection point sometimes correlates with a leak. The ice maker may also produce smaller or misshapen cubes if the supply line is partially compromised.
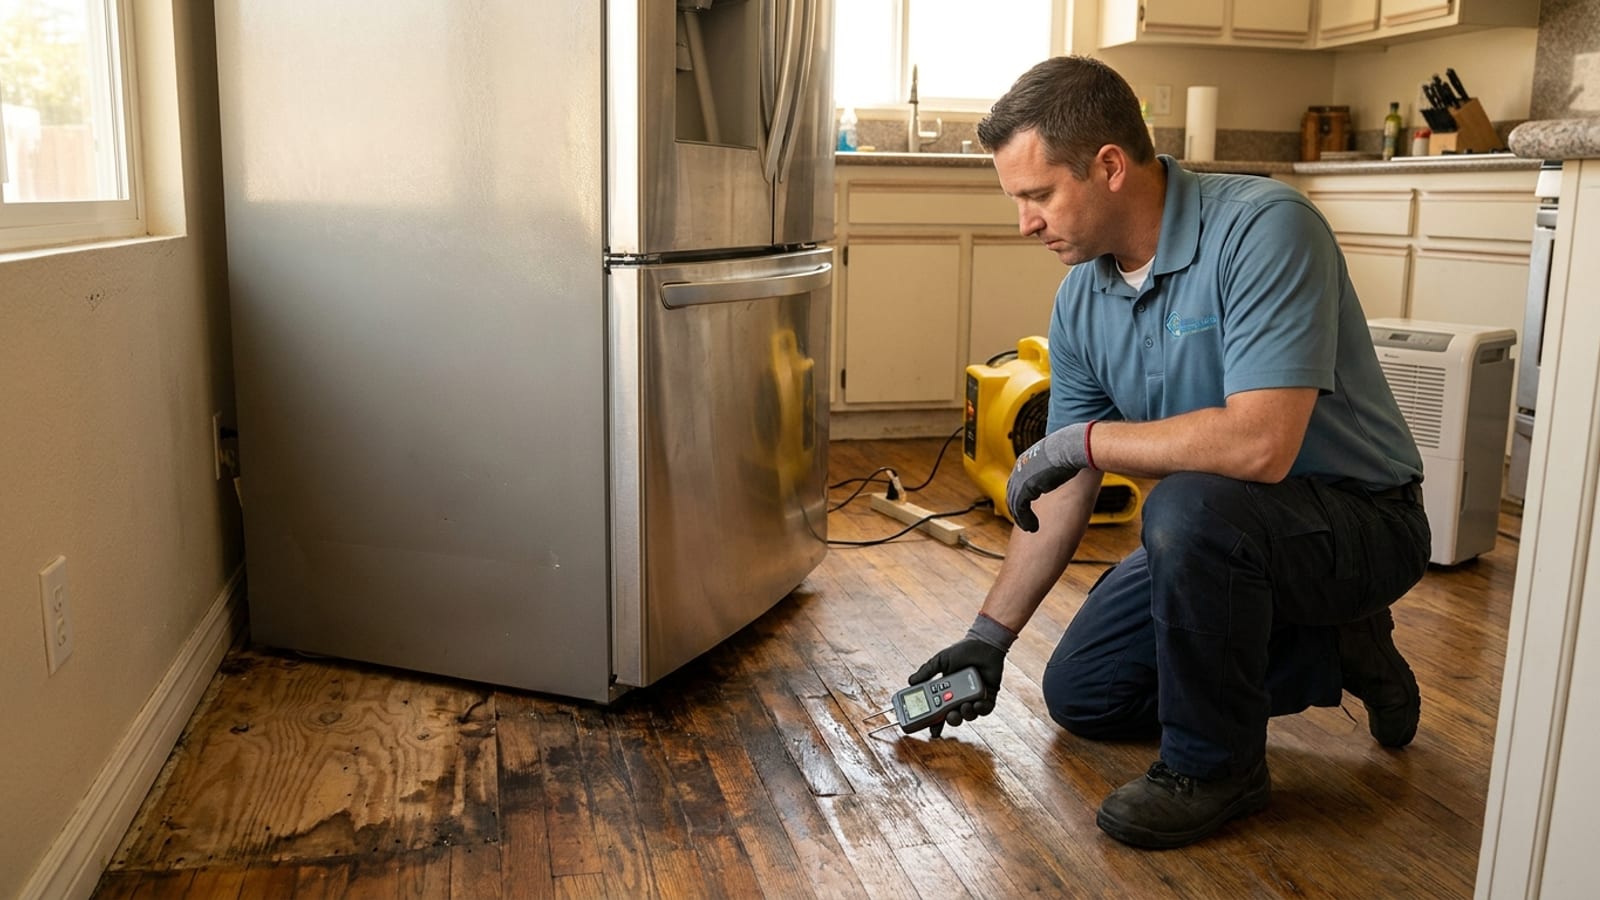
If you notice any combination of these, pull the fridge away from the wall and inspect the supply line carefully. Look for mineral deposits (white or orange crusty buildup) around fittings, which indicate water has been present. Check the floor directly behind the unit for staining, softness, or any sign of standing moisture.
What’s happening under the surface
The damage pattern from a refrigerator water line leak follows a predictable path that homeowners rarely get to see until a restoration crew opens up the floor.
The water first saturates the subfloor sheathing, typically oriented strand board or plywood depending on the age of the home. These materials absorb water readily and begin to swell, delaminate, and lose structural integrity over time. A subfloor that’s been wet for several weeks can compress under foot traffic, which is that spongy feeling you notice. A subfloor that’s been wet for months may show actual rot in the affected zone.
At the same time, the moisture creates ideal conditions for mold. Mold doesn’t need much: surface moisture, some organic material (which wood-based subfloor provides in abundance), and warmth. San Diego’s consistent temperatures, even in winter, mean mold can get started and grow year-round. The IICRC S500, the standard most reputable restoration companies follow, treats any moisture intrusion as a potential mold event within 24 to 48 hours of sustained wetness.
For a leak that’s been running for weeks, mold colonies beneath the flooring are almost a given. They may not be visible from the surface, but they’re producing spores that circulate through the kitchen air. That musty smell? That’s often mold making itself known before it becomes visible. If you want to understand more about how quickly this escalates, read about will water damage grow mold and what drives the timeline.
The situation shares a lot in common with a slow dishwasher leak, another appliance source that tends to stay hidden under cabinets for far too long before anyone notices.
How professional detection and drying actually works
Once you’ve turned off the water supply to the refrigerator (the shut-off valve is usually behind the unit or under the sink nearby), the next step is understanding how far the damage has actually traveled. This is where guessing gets expensive.
A restoration technician will use a combination of moisture meters and thermal imaging to map the full extent of saturation. The moisture meter reads the moisture content of the subfloor and flooring material directly. Thermal imaging shows temperature variation, and because wet materials hold temperature differently than dry ones, it reveals the shape of the wet zone without having to tear up the floor first. In many cases, the saturated area is significantly larger than what the homeowner expected based on the visible discoloration.
From there, the process depends on what the readings show. If the flooring material is salvageable and hasn’t delaminated, technicians can sometimes inject air underneath and dry it in place using low-profile drying systems. If the flooring has buckled or the subfloor reads at a moisture content high enough to indicate rot or active mold, that material needs to come out before drying can proceed effectively.
Drying a properly assessed kitchen subfloor usually takes three to five days with commercial-grade air movers and dehumidifiers running continuously. The equipment creates a controlled drying environment, pulling moisture out of the subfloor and structural framing and exhausting it from the space. Technicians return daily to take moisture readings and adjust equipment placement as the numbers drop. Drying is complete when moisture levels return to a baseline consistent with the surrounding unaffected areas.
For more significant water volumes, emergency water extraction equipment may be used first to pull free-standing water from the subfloor cavity before the drying equipment goes in.
This is the core of what water damage restoration involves: not just removing visible water, but systematically driving moisture out of structural materials before permanent damage sets in.
What to do right now if you suspect a leak
Pull the refrigerator away from the wall. Unplug it first, then move it carefully, watching the water line as you go to avoid pulling it taut or disconnecting it. Once you have access to the back panel and the floor behind the unit, here’s what to do:
Turn off the water supply to the fridge. The shut-off valve is usually on the wall or inside the cabinet adjacent to the fridge. Clockwise closes it. If you can’t locate a dedicated valve, shut off the main water supply to the house.
Document everything before you clean anything. Take photos of the supply line connection, the floor directly behind the unit, any visible staining on the subfloor or lower cabinetry, and the condition of the flooring in the surrounding area. This documentation matters for insurance.
Press down on the flooring in different spots around the fridge location. Any area that feels soft, springy, or that sounds hollow compared to nearby sections has moisture underneath.
Do not run fans into a suspected mold zone without professional guidance. Running a box fan across a mold-affected area doesn’t dry it safely; it disperses spores into the rest of the kitchen.
Contact your homeowner’s insurance carrier and let them know you’ve found a slow leak. Coverage for refrigerator water line damage varies. Sudden and accidental damage is typically covered; gradual leaks that developed over an extended period are often excluded or disputed. The sooner you report it and start professional documentation, the stronger your position.
When to call us
A refrigerator water line leak that’s been running for more than a few days is beyond what fans and towels can address. The subfloor and any mold that’s developed need professional equipment and trained eyes, not a weekend DIY project. The longer saturated materials stay wet, the more the repair scope grows.
If you’ve pulled the fridge back and found staining, soft flooring, or a musty smell that won’t quit, get a moisture assessment before you make any decisions about repairs.
Call us at (858) 925-5546 for a same-day estimate.